Working with versioned libraries
Use harmon.ie Classic when you work with SharePoint versioned libraries to check in, check out, discard check out, publish major version, add new version, view version history, and restore an old version.
If you check in or check out a document using an external application, like Microsoft Word, the sidebar needs to be refreshed to display your changes. Use the Refresh icon ( ) in the toolbar, or press F5, to display your changes.
To check out documents:
- Select one or more documents.
- Right-click and select Check Out. Checked out documents have a small arrow indicator overlaid on their icon (
).
To check in documents:
- Select one or more documents.
- Right-click and select Check In.
- If prompted, fill in all the required properties.
- If prompted, select between Minor version (draft) and Major version (publish).
- Optionally supply Version Comments. for the checked in documents.
- To leave the document(s) checked out, check Keep the document(s) checked out after checking in this versions.
- Click OK.
To discard check out:
- Select one or more documents.
- Right-click and select Discard Check Out.
To add a new version:
You can add a new version to a document uploaded to SharePoint by following these steps:
- Right-click the document and select Add New Version.
- Browse to and select the document you want to upload as a new version.
- Click Open. The new version is uploaded and checked in.
This option is only available for version-enabled libraries.
To publish documents:
- Right-click the document and select Publish a Major Version.
- Optionally supply Version Comments.
- Click OK.
To view version history:
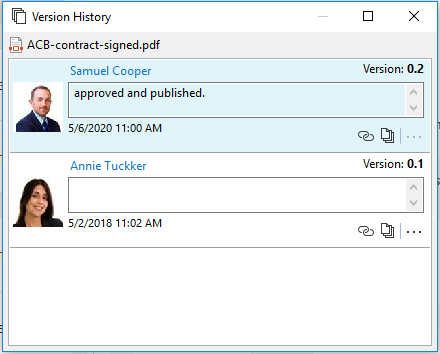
To view the revision history of a SharePoint document, right-click a document and select Version History. The Version History dialog opens.

For each version of the document you can:
- See who created the version and when.
- View the version number and comments of each revision.
-
Click the Copy Link icon (
) to copy the URL of a specific version of the document to the clipboard. By linking to a specific version the contents of the linked document will not change.
-
Click the Open icon (
) to open a specific version of the document.
-
Click the More Actions icon (
) and select:
- Restore Version to restore an older version of a document.
- Delete Version to delete a specific version.
To restore an old version of a document:
- Right-click the document and select Version History.
- Locate the version you want to restore, select the More icon (
) > Restore Version.
If you replaced a document with a newer Office extension (for example .doc with .docx), and would now like to restore the document to an old version with the old Office extension:
- Restore the version as explained above. The document still includes the new extension.
- Download the document to your computer.
- Manually rename the extension to the old extension.
- Add a new version and select the old extension document.
