Managing SharePoint, Teams, and OneDrive documents
harmon.ie Classic is a central hub for all your SharePoint, Teams, and OneDrive files and locations. Use harmon.ie to easily access and manage your Microsoft 365 files – create, delete, rename, move, copy, open, share and more.
Learn how to work with the document list in harmon.ie:
- Create new documents, items, and folders.
- Delete a document or folder.
- Rename a document.
- Move or copy documents.
- Add as Attachment.
- View and edit documents.
- Open a document in browser.
- Share documents.
- Set or clear retention labels.
- View and edit document properties.
- Work with versioned libraries: check in, check out, discard check out, version history, publish major version, add new version, restore an old version.
- Download documents from SharePoint.
- Upload documents to SharePoint.
- Work with offline documents.
- Approve and reject documents.
How to delete a folder or a document
To delete a selected document or folder from SharePoint, Teams or OneDrive, right-click the item and select Delete, or use the keyboard shortcut Delete. If you delete a folder, all contents inside the folder are removed. Deleted items are moved to the SharePoint site’s Recycle Bin. You can restore deleted items from the Recycle Bin, which is available from SharePoint’s Web interface.
How to rename a document
To rename a document, right click the document and select Rename, then type the new name and click OK.
How to open in browser
Right-click a subsite, document library, folder, or document, and select Open in Browser to open the SharePoint item in a Web browser.
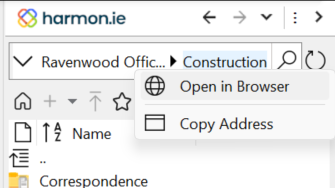
The Open in Browser operation is also available from the context menu of the breadcrumbs, located in the navigation & search omnibox above the document list. Right-clicking the right-most element in the breadcrumbs is the easiest way to open the current location in the browser.

How to set or clear Retention Labels
This feature is available if an administrator defined Retention Labels in the SharePoint location.
To set Retention Labels
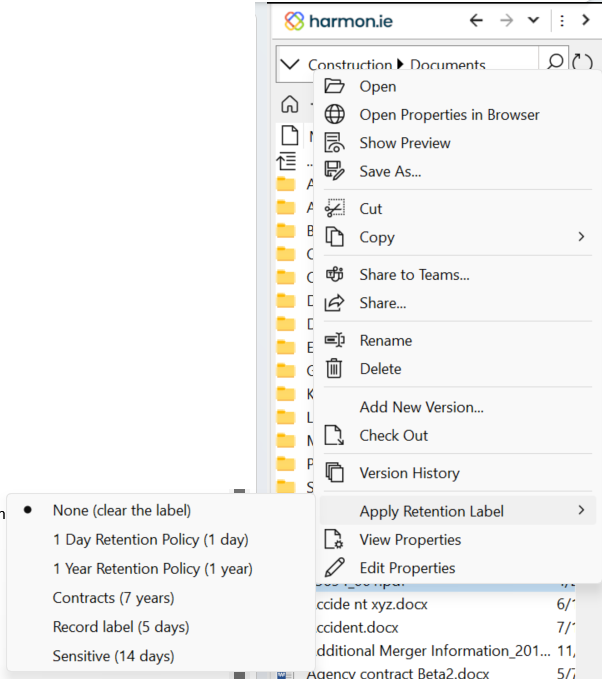
- Right-click folders and/or documents and select Apply Retention Label.
- Select the label you want to set.
– or –
- Right-click folders and/or documents and select Edit Properties.
- Select the Retention label from the drop-down list at the top of the Edit Properties dialog.
- When the retention label is a record, the record icon (
) is overlaid on the Type icon.
- You can not change the Retention Label of documents that are declared as a record.
To remove a Retention Label
- Right-click a folder or documents and select Apply Retention Label.
- Select None.
To view what Retention Label is set
Right-click a folder or documents and select Apply Retention Label. A dot next to a label indicates it is the set label.
– or –
Right-click a folder or documents and select View Properties. The Retention Label is written below the document name.
Clipboard operations
You can use standard clipboard operations (Cut, Copy, and Paste) to move and copy documents between different locations in SharePoint,
Outlook, and your computer. These operations are available from the sidebar’s document context menu.

Use the Copy command menu to
- Copy the Document itself.
- Copy a Link to the document. This option places the document name with a hyperlink to its location on the Clipboard.
- Copy a Link (Document ID) to the document. This option places the document name with a hyperlink to its document ID on the Clipboard. This option is available if the library contains a Document ID property.
- Copy the Address of the document. This option places the URL of the document on the Clipboard. The Copy Address command is also available for subsites, libraries, and folders, and in the breadcrumbs context menu in the sidebar status bar.

Use the Cut command to move documents inside the harmon.ie sidebar
- When cutting and pasting to Outlook or to your computer, the command behaves as the Copy command.
- When using the Cut command and pasting the document to another SharePoint site,
the document’s meta-information, including document properties, workflows, approval status, version history and content type, is lost. - When using the Cut command and pasting the document to another document library, the document’s meta-information is saved. Note, however, that all the properties are copied only if the document’s content type exists in the destination location. If not, the default content type is assigned to the document, and the common properties are copied.
How to approve or reject documents
- If major and minor versions are being tracked in a document library that requires content approval, you must publish the document first.
- Right-click the document and select Approve/Reject.
- Mark the document as Approved, Rejected, or Pending. Optionally enter a comment about why the document was approved or rejected.
- Click OK.

