Uploading content to SharePoint, Teams, and OneDrive
harmon.ie Classic allows you to easily upload emails, attachments, Outlook items, Outlook folders, documents, and folders to SharePoint, Teams, or OneDrive:
- Use simple drag-and-drop to upload emails, attachments, documents, and folders to SharePoint, Teams, and OneDrive.
- Upload documents and folders with harmon.ie’s Upload button.
- Automatically migrate emails to SharePoint, Teams, and OneDrive.
To drag and drop items to SharePoint, Teams, or OneDrive:
- Find the location to which you want to upload the documents.
- Drag and drop document(s), folder(s), email message(s), or Outlook folder(s) from your computer, or from Outlook, to:
- A SharePoint site, document library, or folder, to upload them to this location.
- A SharePoint document, to replace it with the uploaded document.
- A SharePoint list item, to upload as item attachments.
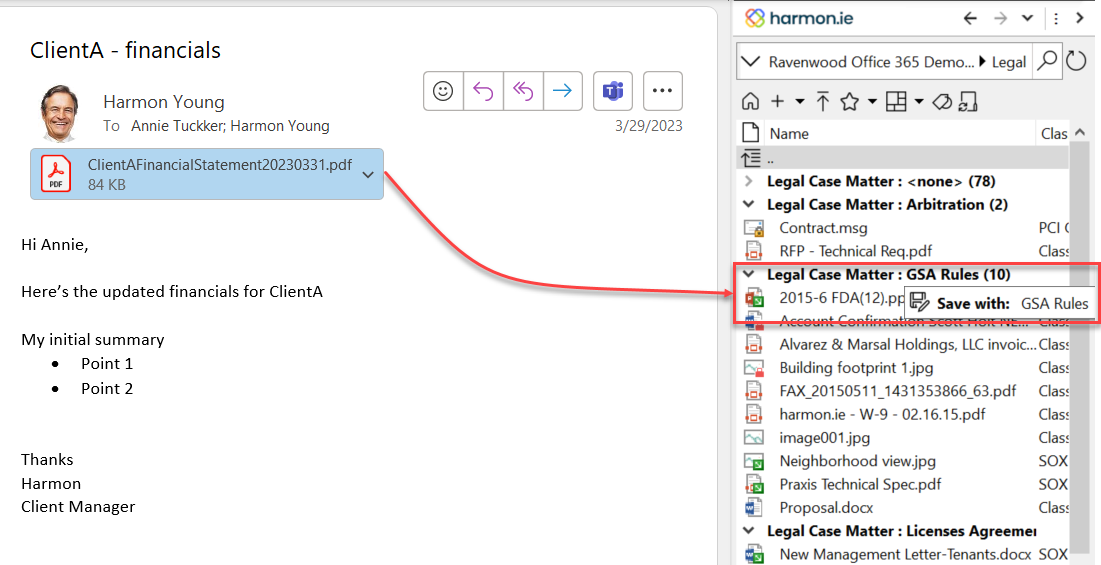
- A SharePoint group header, to upload and associate the item with that group.
- A Teams location or folder.
If you drag an item to a Teams location without specifying the folder, it is saved in the Teams location’s default folder.
- A OneDrive folder.
- Monitor the drag and drop process.
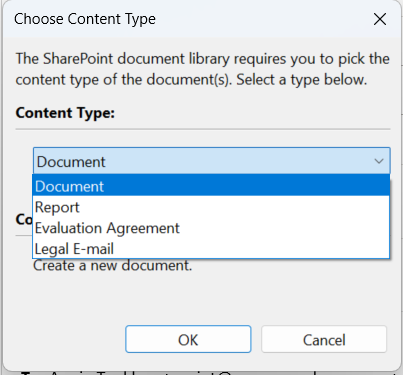
- If prompted, select a content type.
- If the Properties window opens, fill in the required properties, and then click Save.
- If prompted, check in the document, to make it available to all users.
- The drag-and-drop process of Exchange public folders may be extremely slow since items are downloaded individually from the Exchange server, and bandwidth for public folders may be limited by the server.
- Due to an Outlook limitation, it is not possible to upload folders that include characters which do not match your machine locale.
To monitor and stop the upload/drag and drop process:
When item(s) are being uploaded, you can monitor the progress in the progress bar, which appears at the bottom of the harmon.ie sidebar. From here you can see the name of the current item being uploaded and the status of the upload. To stop the current upload process, click the Cancel Operation icon () in the progress bar.

To select a content type:
When uploading/dragging and dropping document(s) to a document library with multiple content types, by default, the document(s) receive the default content type. You can configure harmon.ie to prompt you to select a document content type. In this case, a list of the available content types opens. Select the content type and click OK. The selected content type applies to all the uploaded items.
To set document properties:
In the following cases uploaded documents are checked out (and not visible to other users) and the Properties window opens:
- If a document library is configured with required properties that do not have a default value.
- If column validation is defined and the validation fails.
- If the Properties window was configured to be opened on every upload, to remind you to fill in the document properties, whether they are required or optional.
Edit the required properties and/or validate the values, and then click Save.
If you do not fill in the required metadata, or when column validation is defined and the validation fails, you are warned about leaving the uploaded documents checked out and not available to other users:
- Click Yes to close the Properties window and leave the documents checked out and hidden from other users.
- Click No to return to the Properties window and fill in the required properties.
- Check Do not warn me again, if you do not want to be warned that properties are missing.
- You can configure whether you want harmon.ie to warn you when you do not fill in required properties.
To check in uploaded documents:
When you upload/drag and drop documents to document libraries that require checking out documents before editing, the uploaded documents are automatically checked out. These documents are not visible to other SharePoint users until checked in. harmon.ie prompts you to check in the documents to make them available to other users.
- Click Yes to check in all uploaded documents and make them available to other SharePoint users.
- Click No to leave the documents checked out and hidden from other users.
- Check Remember my choice, if you do not want to be prompted to check in documents on upload/drag and drop. Your answer is applied to future uploads/drags and drops, with documents always checked in automatically (if Yes was selected), or always left checked out (if No was selected).
- You can configure whether you want harmon.ie to prompt you to check in documents.
- The Check In setting is global for all SharePoint sites.
- This setting also applies to scenarios where documents would be left checked out after editing document metadata.
To add new versions or replace existing documents:
You can replace existing document(s) (when uploading/dragging and dropping to libraries with no versioning support), or add new versions to the document(s) (when uploading/dragging and dropping to libraries with versioning support) by uploading/dragging and dropping the document(s) to SharePoint again.
You can replace a document, or add a new version, even when the document name has changed.
To add new version(s) or replace document(s) with document(s) with the same name(s):
- When uploading/dragging and dropping to a document library with versioning support:
- Upload the document(s) using the Upload icon (
) or using drag and drop to the library.
- A dialog prompts you to add a new version to the existing document:
Check Add as a new version to existing document(s) to add the uploaded document(s) as new version(s) to the existing document(s). The contents of the new document(s) are updated, while document metadata and history are preserved.
Uncheck to rename the uploaded document(s). In this case, a running count is appended to the document names (for example findingpeople.doc, findingpeople (2).doc, findingpeople (3).doc, etc). - Click OK to continue or Cancel to cancel the upload/drag and drop operation.
When uploading/dragging and dropping multiple documents: Click Skip to skip the upload/drag and drop of the current document that already exists in SharePoint. Check Apply to All to apply the selected action to all uploaded documents.
– or –
Right-click the document and select Add New Version, then browse to and select the document you want to add. - Upload the document(s) using the Upload icon (
- When uploading/dragging and dropping to a document library with no versioning support:
- Upload the document(s) using the Upload icon (
) or using drag and drop to the library.
- A dialog prompts you to overwrite the existing document(s):
Check Overwrite existing document(s) to replace the document(s) with new one(s).
Uncheck to rename the new document(s). In this case, a running count is appended to the document names (for example findingpeople.doc, findingpeople (2).doc, findingpeople (3).doc, etc). - Click OK to continue or Canel to cancel the upload/drag and drop operation.
When uploading/dragginga nd dropping multiple documents: Click Skip to skip the upload of the current document that already exists in SharePoint. Check Apply to All to apply the selected action to all uploaded documents.
- Upload the document(s) using the Upload icon (
To add a new version or replace a document with a document with another name:
Use this method in this scenario: you uploaded a document to SharePoint and sent it to someone outside of your company for review. This person returns the revised document to you with another name or with a newer Office extension (for example .docx instead of .doc). To replace the original document and to preserve the original name, or to upgrade the document version:
- When uploading to a document library with versioning support:
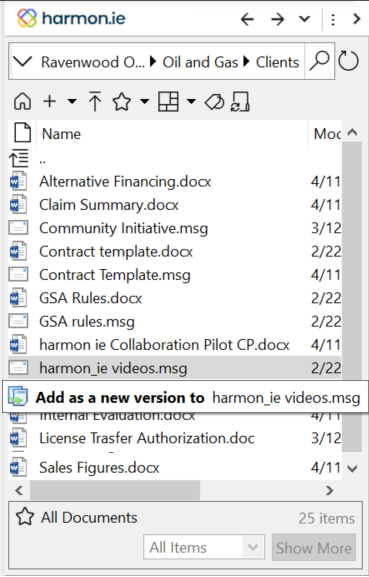
- Drag the document onto the document you want to overwrite and hold for 2 seconds. A tooltip displays: Add as a new version to <document name>.
- Drop the document. The new document is renamed to the existing document name on which you dragged this document, and added as a new version of that document.
– or –
Right-click the document and select Add New Version, then browse to and select the document you want to add. - Drag the document onto the document you want to overwrite and hold for 2 seconds. A tooltip displays: Add as a new version to <document name>.
- When uploading to a document library with no versioning support:
- Drag the document onto the document you want to overwrite and hold for 2 seconds. A tooltip displays: Overwrite <document name>.
- Drop the document. You are asked if you want to overwrite the existing document. If you click OK, the new document is renamed to the existing document on which you dragged this document, and replaces that document.
- You can replace a document using this method, if both the existing and new documents have the same file type.
- The feature of replacing a document with a document of a newer Office format (for example .docx instead of .doc) must be enabled by your administrator.
- When upgrading the Office version, harmon.ie adds a comment to the document indicating the extension change.
- To restore a version to its old extension, follow the directions under restoring an old version.
To upload to a grouped location:
When Group By is defined for a view, harmon.ie groups the SharePoint items by category.
When you drag-and-drop items onto the group header, the items are uploaded to the location and the header value is assigned to the property.
Example: To assign Classification to Classified, drag the item and drop it on the Classification : Classified group header.


