harmon.ie Classic Options
This article explains the various options a user can set to configure how harmon.ie Classic works. Administrators can centrally configure harmon.ie Classic for all users via registry.
To open harmon.ie options:
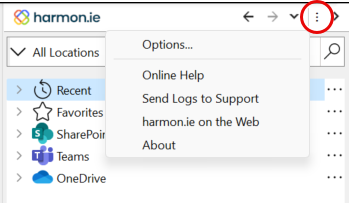
Click the harmon.ie menu icon () in the sidebar, then click Option.

Or, click the arrow in the lower right corner of the harmon.ie ribbon group.

The SharePoint tab
To add SharePoint sites:
- Open options.
- Select the General tab.
- Click Add. The Add SharePoint Site dialog opens and lets you configure a new site.
To edit SharePoint sites:
- Open options.
- Select the General tab.
- In the Sites list, select the site you want to edit, and then click the Edit button. The Edit SharePoint Site dialog opens and lets you edit the site settings.
To remove a SharePoint site:
- Open options.
- Select the General tab.
- In the Sites list, select the site you want to remove, and then click the Remove button.
To reorder SharePoint sites:
- Open options.
- Select the General tab.
- In the Sites list:
- Click a column name to sort the list of SharePoint sites. To reverse the sort order, click the column name again.
- Select a site and use the Move Up and Move Down buttons to change the order between the added SharePoint sites.
The order you set in this dialog will be used in the sidebar panel.
To enable Office Online for a site:
To enable Office Online for a specific site:
- Open options.
- Select the General tab.
- Select the SharePoint site and click Edit Site.
- In the Edit SharePoint Site dialog box select Open supported documents in Office Online.
To show limited or no access subsites:
- Open options.
- Select the General tab.
- Clear the Hide subsites with limited or no access check box. Note that clearing this option does not allow you to open documents for which you do not have permissions.
To test the connection with your SharePoint site and report to harmon.ie support:
- Open options.
- In the Sites category, select your site, click Edit or Add, then Test Connection. If a connection cannot be established, you may submit a problem report by clicking the Send Report button in the Failed to Connect message box.
Select the General tab.
To manually configure or change the social server:
- Open options.
- Select the General tab.
- From the Select the social server drop-down list, select the social network server from any of the registered SharePoint sites.
To remove the social features:
To remove SharePoint social integration, and disable all social features in harmon.ie, do the following:
- Open options.
- Select the General tab.
- From the Select the social server drop-down list, select None.
To enable/disable sites and favorites sharing:
- Open options.
- Select the General tab.
- Check or clear the Share sites and favorites across my clients check box.
To show/hide the Sites I’m Following:
- Open options.
- Select the General tab.
- Check or clear the Show Sites I’m Following check box.
To configure Views options:
- Open options.
- Select the General tab.
- Select Always show these columns, and then click Visible Columns to open the Visible Columns dialog box where you can configure visible columns to configure the columns you want to see when navigating.
– or –
Select Use the default SharePoint view to open the default view when navigating.
To change Group By options:
- Open options.
- Select the General tab.
- Click the Group By button:
- Check Exclude folders from an empty group if you want to view folders that do not belong to any group in the beginning of the document list. Uncheck if you want to view them in the empty group (for example in Territory:<none>).
- Check Show Group By field name if you want to show the field name by which the content was grouped. Uncheck if you do not want to see the field name.
To enable/disable the recent items feature:
- Open options.
- Open the General tab.
- Check/uncheck Views > Load items by date modified (start with most recent).
To set the number of recent items that are shown:
- Open options.
- Open the General tab.
- Check Load items by date modified (start with most recent) > x items at a time, and set the number of recent items you want shown at a time. You can select any value between 100 and 1000.
To configure upload options:
- Open options.
- Select the General tab.
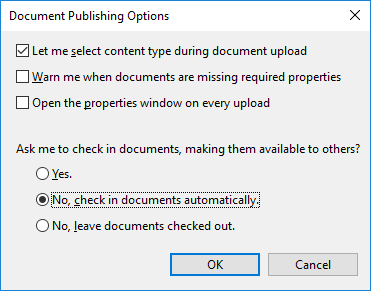
- In the Documents area > Set options for uploading and editing documents, click Options, and configure the following:
- To configure if you want to select a content type during document upload, check Let me select content type during document upload.
- To configure if you want to be warned about missing required properties, check Warn me when documents are missing required properties if you previously checked Do not warn me again in a warning prompt and want to revert to the default behavior.
- To open the Properties window on every upload, check Open the properties window on every upload.
- To configure if you want to be prompted to check in documents and make them available to others, select one of the following:
- Yes
- No, check in the documents automatically
- No, leave documents checked out

To configure how to open Office links:
You can configure how Office links created by harmon.ie will be opened.
- Open options.
- Select the General tab.
- In the Documents area > Office link open preferences, select Match Office to open according to your Office settings (i.e. in the desktop or web app) or to Always open in desktop app.
The Advanced tab
To set harmon.ie’s default view:
You can configure which view to open when harmon.ie starts:
- Open options.
- Select the Advanced tab.
- Set Start the sidebar with to Last View (opens the last view you used before exiting harmon.ie) / All Locations.
To configure SharePoint drag-and-drop options:
This option applies to attaching SharePoint, Teams, and OneDrive documents to email and to copying documents with ctrl+c. It does not apply to list items.
- Open options.
- Select the Advanced tab, and check Drag files instead of file links to Outlook.
To reverse the behavior set in the application options, hold the Alt key while dragging a document from the sidebar.
To set the default drag-and-drop mode to move:
- Open options.
- Select the Advanced tab and check Move email instead of copy to harmon.ie.
To set email options:
Use harmon.ie Options to set the default action taken when sending email messages containing attachments. You can override these settings for a specific email message using the Save Attachments button, available in the harmon.ie ribbon button.
To set the default action when sending an email message with attachments:
- Open options.
- Select the Advanced tab.
- Under Email Settings click the Prompt to save attachments when sending emails > Options button. The Save attachment options dialog appears.
- Select one of the following Ask me to save attachments when sending emails options:
- Always: Each time you send an email message with attachments, you are asked if you want to upload the attachments to SharePoint and replace them with links. This is the default setting. Select this option if you always want to be prompted to replace attachments with links.
- Never: Select this option if you do not want to be prompted to replace attachments with links. In this case the attachments are sent as physical files and are not uploaded to SharePoint.
- Only if all recipients are from the following domains: Select this option to instruct harmon.ie to prompt you to upload the attachments to SharePoint and replace them with links when all the recipients (To, Cc, and Bcc) belong to one of the domains listed in the text box.
This field defaults to the domain used by your default Outlook account. Separate multiple domains by commas. Wild cards (‘*’) are allowed.
To set whether to always prompt to save an outgoing message to SharePoint:
- Open options.
- Select the Advanced tab.
- From the Ask me to save email when I send it drop-down list, select:
- Always to prompt to save the email to SharePoint.
- Never to not prompt to save the email to SharePoint.
- Remember my choice to remember your last selection.
To save email messages with unique names:
- Open options.
- Select the Advanced tab.
- Under Email Settings, check Save emails with unique names.
With this option, harmon.ie concatenates the sending time and sender name to the email subject to create unique names to each email saved to SharePoint. Example: Mutual NDA_2016-09-15_06-52-42_Harmon Young.msg.
For more information, read the KB article Ensuring Unique Naming for Email Messages Saved to SharePoint or Teams with harmon.ie Classic.
To configure document sharing:
- Open options.
- Open the Advanced tab.
- Click the Share documents when sending links > Options button.
- Set Share when sending links from: to OneDrive Only / OneDrive and Microsoft 365 / Don’t share.
- Set permission levels to: View Item / Edit Item. This sets the default permission level.
- Check Automatically assign these permission levels to recipients for automatic sharing of documents and items. Clear to be prompted to share documents and items.
- Click OK.
To save email headers in SharePoint columns:
- Open options.
- Select the Advanced tab > Email Header Mapping.
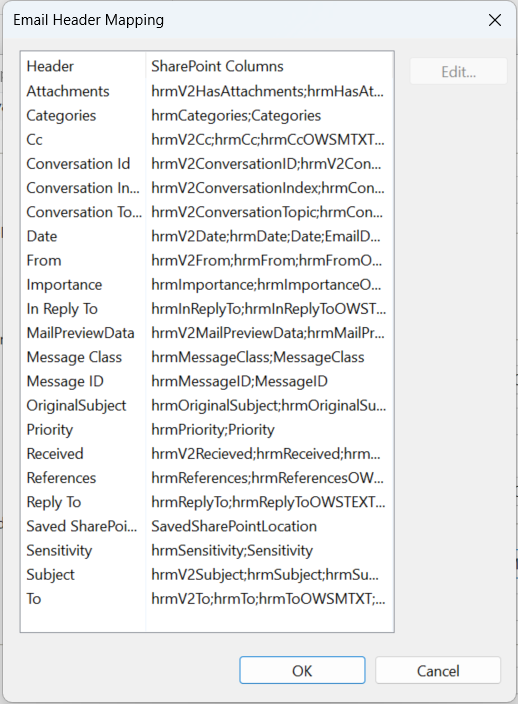
- Click the Map email headers to SharePoint columns > Mapping button to open the Email Header Mapping dialog.
- From here, you can edit existing email headers.
Multiple SharePoint fields, separated by a semicolon, can be configured as candidates to be mapped to an email header. harmon.ie assigns each header value in an email message to only one SharePoint field – the first in the list of fields that exists in the document library. Any email header field can be mapped to SharePoint metadata.
For more information, read How to Save Email Headers in SharePoint and Teams Columns Using harmon.ie Classic.
To create email view with metadata columns:
This setting controls if and where harmon.ie attempts to create an Email view and save email headers as columns, when saving email messages to Microsoft 365.
- Open options.
- Select the Advanced tab.
- In harmon.ie 365: Set Create email view with metadata columns to Teams Only, SharePoint and Teams, or Nowhere.
In harmon.ie for SharePoint: Set Create email view with metadata columns to Enable or Disable.
To configure what to do when saving an item to Teams:
When a user saves an email or document to a Teams location using harmon.ie, harmon.ie prompts to share the file in the Team’s channel. To change the default behavior:
- Open options.
- Select the Advanced tab.
- Set Post to the channel when saving an item to Teams to one of these options:
Prompt will open a dialog asking the user if they want to share the uploaded item(s) to the Teams channel.
Never will never prompt the user to share in the Teams channel.
Always will always launch the Share to Microsoft Teams dialog, without asking the user first.
To set harmon.ie’s display language:
- Open options.
- Select the Advanced tab.
- Set the Display Language to Match Outlook, German, English, or French.
To configure proxy settings:
Follow the directions in Configuring proxy settings.
The License tab
To register a license file:
- Open options.
- Select the License tab.
- Click the Browse button and browse to a valid license (
.lic) file on your computer. - Click Open to apply the selected license file.

