Now that your organization collaborates in Microsoft Teams more than ever, it’s also becoming the primary repository for many types of files. That’s great when everyone involved is in that Team or Channel and they can collaborate right within Teams, but inevitably some files hosted on Teams must get shared with others who don’t have access.
When this occasion arises, you have several options for emailing those files, each with its own ramifications in terms of workflow, security, and version control. Here are four ways you can do it along with the pros and cons for each option.
1. Open, then send
First, find the file in question in Teams and then open it in the file’s native app (s.a. Word). Next, go to File>Share and then choose Send Document (if you want them to be able to edit it) or Send PDF (if you don’t).
This “old-fashioned” method gets the job done, but it’s not terribly efficient and you’re always emailing attachments rather than links.
Pros:
- No need to understand how Teams works
- Anyone who receives the emailed file can open it locally
Cons:
- This method requires you to switch between three different applications (Teams, then Word, then Outlook)
- There’s no version control once that file is sent off
- You’ll have no insight into who else or where else the file has gone
- You’ll have no way to control who copies, edits, or distributes the file
- Increases Outlook inbox bloat for recipients
2. Copy and email a link from Teams
This approach is a big step up from emailing files as attachments. Go to the Files tab for the Teams Channel and locate the file you want to email. Click the (…) 3 dots to the right of the file name and select Copy link. This will open a pop-up window that gives you a link to copy and the default sharing permissions.
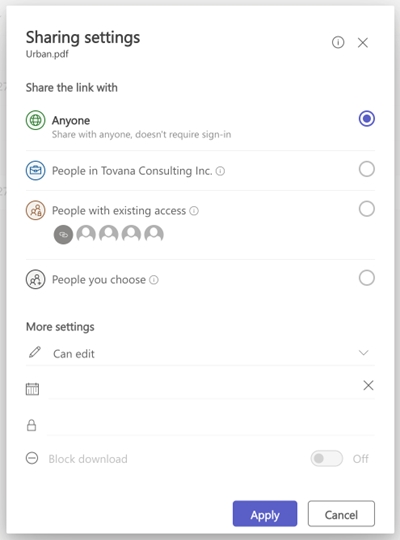
Because you’re sending a link rather than the actual file, Teams permissions can still be applied, so be sure to specify which permissions you want in place for the person/organization you’re emailing. To switch from your organization’s default permissions, Click on the sharing permissions link below the URL box.
The options are:
- Anyone
- People in your organization
- People with existing access
- People you choose
Below that you can toggle between Can edit and Can view to control whether the recipient has view-only access or not. You can then choose to add an expiration date and/or add a password for additional control.
Pros:
- No longer emailing actual file attachments, which increases data security while reducing version control issues
- Range of permission options to customize and control access
Cons:
- Must switch between Teams (to locate the file and create the link) and Outlook (to author and send the email with the link)
- Links without strong permissions could be shared with others who shouldn’t have access
3. Send a link directly from Teams
This option lets you send a permissions-based link right from the Microsoft Teams app. Go to the Files tab for the Teams Channel and locate the file you want to email. Click the (…) 3 dots to the right of the file name and select Share. This will open a pop-up window where you can set the permissions (same as above) and author the message to send the link.
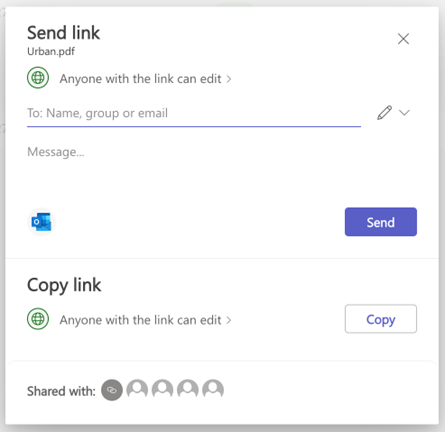
You must enter the email address(es) for each recipient (or address it to existing names/groups) in this pop-up window. You can enter a brief message to accompany the link and then send the message right from Teams.
Pros:
- Don’t have to switch between multiple apps
- No longer emailing actual file attachments
- Range of permission options to customize and control access
Cons:
- Happens within Teams context vs. Outlook where you primarily do your email message authoring
- Can only send one link at a time
- Links without strong permissions could be shared with others who shouldn’t have access
4. Send from Outlook using harmon.ie
Unlike all the methods described previously, this solution lets you email a Teams file without ever leaving your Outlook app. With the harmon.ie 365 Suite, you can easily search or browse for files saved anywhere in Microsoft 365 right from the sidebar window.
After finding the file you want to email in the harmon.ie sidebar, you have two options. The first is the same as described in the section above, you just don’t ever have to leave Outlook. Right-click the file name and select Share. This will pop-up the same dialog where you can set permissions to view or edit the file.
The second option will let you add one or more links to Teams files in the body of an Outlook draft message. Simply drag the file from the harmon.ie sidebar into the draft outgoing email. By default, harmon.ie will create a link to that file in the message body (if you do want to send the actual file as an attachment, hold the “alt” key while dragging the file into your email).
You can even select multiple files and drag and drop all of them at once into the draft email, adding each link to the draft message body before sending.
Pros:
- No need to leave Outlook
- Quick and easy file discovery
- Send multiple links in one step, in a single message
- No longer emailing actual file attachments
- Range of permission options to customize and control access
Cons:
- With so much efficiency at your fingertips, you might need to find a new hobby
Now you know lots of different ways to email a Teams file and the advantages and drawbacks of each. There are plenty of options, but only one lets you do everything from Outlook and send links with confidence!
To see for yourself how harmon.ie can help your business maintain its Teams integrity while collaborating with a broader pool of people and organizations, get started on a free trial today!